-
Mark HOEBEKE authored8866ed51

Branching Basics
Rationale of using branches
A branch is the Git element that allows to make modifications to a project in "isolation", aka without any risk of breaking anything in the project. The main use of branches in development projects are to dedicate a separate branch to each of a program's feature or functionality. And to merge the branch back into the main project branch once the feature has been implemented and tested. Branching also makes sense for single-person projects, when several, preferrably unrelated, parts of the project can be worked on at the same time. When one of the parts is finished it can again be merged into the main project branch. Branches are also useful when some experimentation is needed (ex. : exploring a new implementation of an algorithm in a development project, writing alternative closing chapters for a book managed by Git). If the experimentation is not successfull, the branch will never be merged into the main branch, and can be deleted altogether (remember, it will still be in the project's history anyway).
Important notes
- When creating a repository, Git always creates a
mainbranch (sometimes calledmaster), and makes it the default branch when cloning the repository. - It is a bad practice on a collaborative project to create a branch per contributor. Contributors can work on several aspects of a project, and multiple contributors can work on the same set of files. Using one branch per contributor will quickly lead to merging nightmares.
Using GitLab to manage branches
The GitLab UI provides all the functionalities to manage branches. Until now, we always used the main branch. The following screencast shows how to create a branch in GitLab. When creating a branch, it is recommended to use a meaningful name.The branch will be dedicated to complete information about imaginary animals. By creating this branch, imaginary animal experts can happily work on their favourite pets with the assurance that they will not thread on other domain expert's toes (even if imaginary animal experts can step on each other's toes, more on that later.)
Working on the project's content in a specific branch is no different from working on its contents in the main branch: adding, editing, renaming or removing files behave as usual. Except that the modifications are contained to the branch and not visible in other branches. As can be seen in the following screencast: contents are added with the GitLab UI in the imaginary-animals branch, but when switching to the main branch they are not present.
Using the CLI to manage branches
Switching between branches
In the GitLab UI, working in a branch is performed by selecting a branch from the menu (or by creating a new branch).
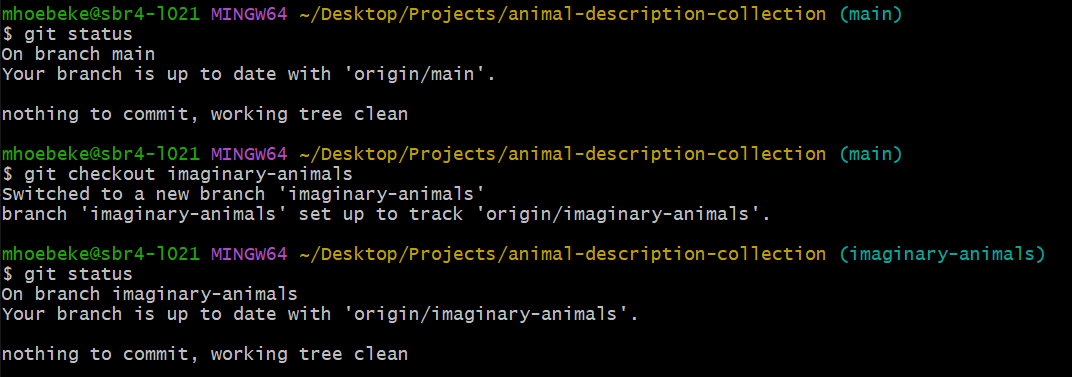
On the command line, switching to another already existing branch is done with the git checkout command
The following screenshot shows how to switch from the current (main) branch to the newly created imaginary-animals branch:
Note
Don't forget to do a git fetch beforehand to retrieve the information about the branch that was created on the remote repository.
Creating new branches
To create a new branch, use the git branch command. This will create a new branch in the local repository only.
The new branch will be based on the current branch. But the new branch will not be checked out (i.e. you will remain on the current branch). You will
need to do a git checkout to switch to the new branch, as shown in the following screenshot:
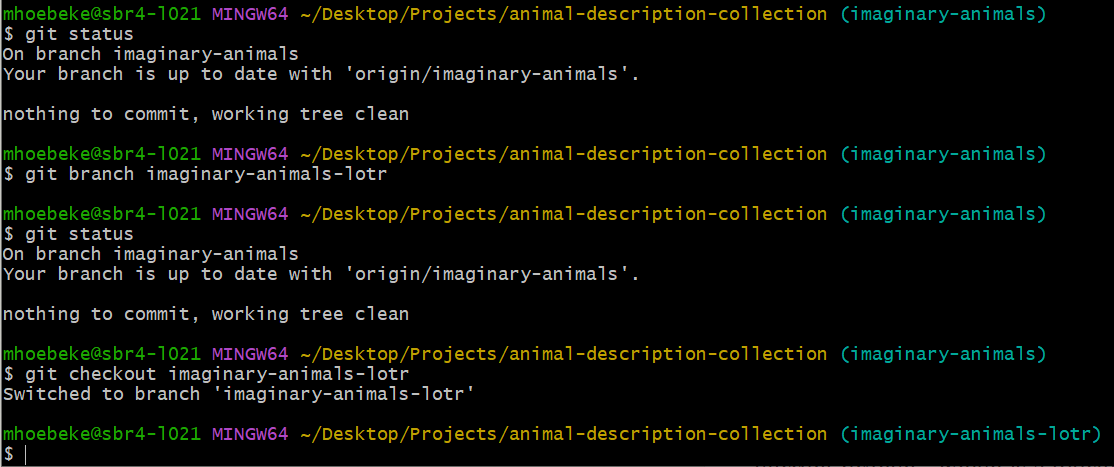
The frequently used shortcut to create a new branch and to perform the checkout at once relies on adding the -boption to git checkoutfollowed by the new branch name, as
shown in the screenshot below:

Note
Before creating the second branch, we did a git checkout to return to the imaginary-animals branch. The imaginary-animals-lotr and imaginary-animals-creepy
branches are two "children" of the same parent branch (imaginary-animals).
Displaying information about branches
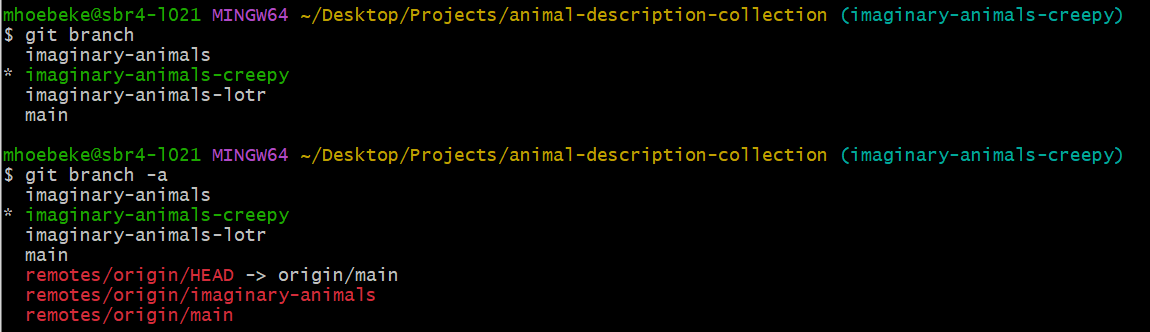
Using git branch without any arguments will display the list of branches in the local repository. Adding the -a option will also add what remote branches
are currently known to your local repository, as shown in the screenshot below:
Merging two branches
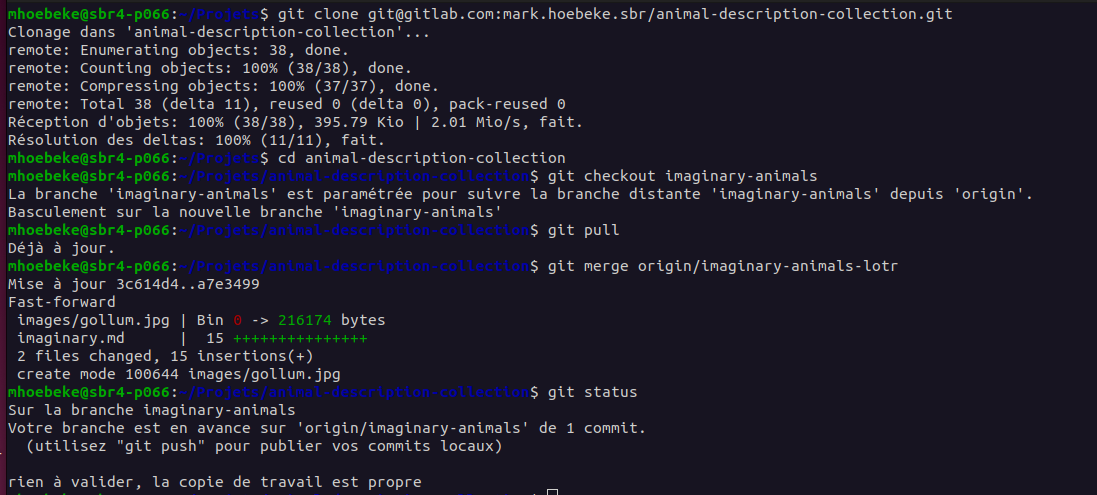
Merging two branches is done by switching to the branch that will hold the result of the merge (the destination branch), and using the git merge commandto specify the other branch (the source branch) from which the changes will be merged. The actual merge operation will (try to) apply to the destination branch, all changes made in the successive commits that have been made to the source branch, since the latest merge, or since the most recent branch was created. If the merge operation uses a remote branch that has not been previously checked out, as a source branch, it is necessary to prefix the branch name with the name of the remote repository (i.e origin/my_source_branch) otherwise, the name of the source branch is enough.
Note
It is recommended to use a git pull on the destination branch before attempting the merge to ensure it is in the most recent state.
When the source branch is a local branch, it is also recommended to have done a git pullfor the same reasons.
The following screenshot shows the full set of commands that will merge the (source) branch imaginary-animals-lotr into the (destination) branch imaginary-animals
Sometimes, a merge operation can not be achieved successfully. This happens when there are conflicting changes in the source and destination branch. In this case, the output of the git merge command will explicitely mention which files contain conflicts.
The following screenshot shows what happens when trying to merge the imaginary-animals-creepyinto the imaginary-animals branch, after the previous merge of imaginary-animals-lotr into imaginary-animals.

In each of the files, the conflicting blocks will be clearly marked as follows:
- A first line with a set of
<<<<<<<<characters and the name of the destination branch (or theHEADtag) - The set of conflicting lines in the destination branch
- A line with a set of
========characters - The set of conflicting lines in the source branch
- A line with a set of
>>>>>>>>characters and the name of the source branch.
The follwing screenshot shows the conflicting block in the imaginary.md file.
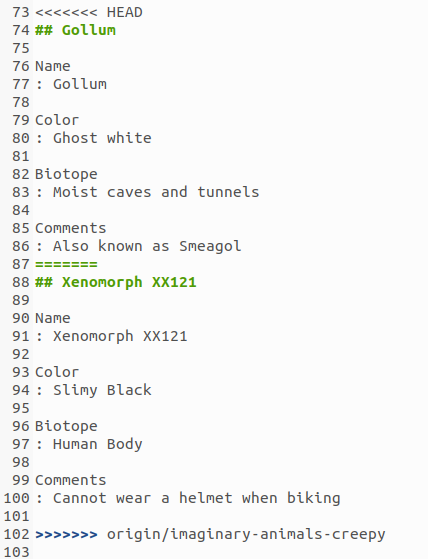
The conflict stems from the fact that two entries where added at the end of the file in two separate branches. Git cannot decide which changes to keep in the merge result.
Solving a conflicts implies:
- Editing the file(s) with the conflict(s) to decide what part(s) to keep in the resulting file(s).
- For each of these files, use
git addto include the files in the upcoming commit - Use
git committo integrate the files with the now resolved conflict in the destination branch.
The following screenshot shows the sequence of operations to solve the conflict in imaginary.md